Neodynamic
Well-known member
- Joined
- Dec 5, 2005
- Messages
- 137
- Programming Experience
- 10+
Prerequisites
- Neodynamic ThermalLabel SDK 2.0 for .NET
- Microsoft .NET Framework 2.0 (or greater)
- Microsoft Visual Studio 2005 / 2008
- Microsoft Visual Web Developer Express 2005 / 2008
- Any Zebra Thermal Printer supporting ZPL (Zebra Programming Language) or EPL (Eltron Programming Language)
In an ASP.NET Web Application, Server-side printing means that the printing job takes place on the Server machine which is hosting and running our ASP.NET Web Application as is illustrated in the following figure.
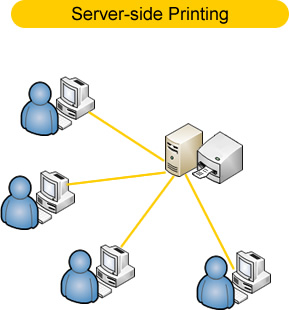
In ASP.NET Server-side printing scenarios, a Thermal Printer is installed on the server machine (USB, Serial or Parallel ports) or it can be a standalone printer identified by an IP address. To print barcode thermal labels you create the label design and print it by using server side code (C# or VB.NET) and ThermalLabel SDK object model inside your ASPX web page.
In the following sample code, a simple ASP.NET (ASPX) web page is created displaying a TextBox and a Button. When the page is requested/viewed by a user, it will be able to enter a number to encode a product ID. When the user hits the submit button, a server side code is executed and a barcode label will be printed with a Thermal Printer installed on the server (in this sample an USB Thermal Printer)
IMPORTANT: To test the sample code you must have installed a Zebra ZPL-based or EPL-based thermal printer.
Follow these steps:
- Download and install latest version of Neodynamic ThermalLabel SDK for .NET
- Open Visual Studio 2005 /2008 or Visual Web Developer Express 2005 / 2008 and create an ASP.NET Web site using your preferred .NET language like VB or C#.
- Add a reference to Neodynamic.SDK.ThermalLabel.dll assembly. To do that, go to Website > Add Reference... and in the dialog box, look for the ThermalLabel SDK assembly. Click OK.
- Open the default.aspx WebForm and drag & drop a TextBox and a Button ASP.NET Server Controls. After that, please design the page so it looks like the following figure:
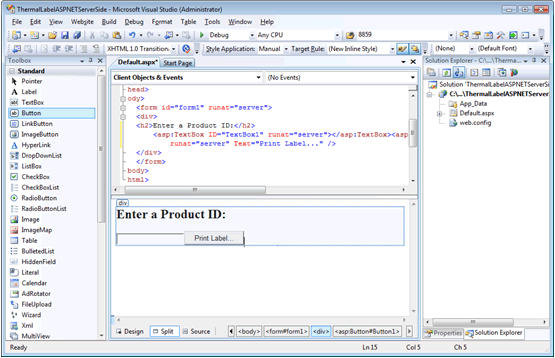
On the web page, double-click on the "Print Label..." button to add the printing code on the Click event.
IMPORTANT NOTICE
+ Although ThermalLabel SDK supports both ZPL and EPL printers, a label design you write using .NET code like C# or VB.NET will not produce the same output printing under ZPL and EPL printers. If you need to support both printer languages in your project then you will have to design two different labels targeting each printer language separately.
+ In the following code you will have to change the Thermal Printer settings like printer name, type of communication, DPI, printer programming language, etc. to match yours.
Remember that is a simple sample code. The following code will try to print a barcode on a thermal label encoding the product ID provided by the user on the ASP.NET web page.
For ZPL-based Printers
Visual Basic .NET
'Define a ThermalLabel object and set unit to cm and label size
Dim tLabel As New Neodynamic.SDK.Printing.ThermalLabel(Neodynamic.SDK.Printing.UnitType.Cm, 6, 0)
'Define a BarcodeItem...
Dim bcItem As New Neodynamic.SDK.Printing.BarcodeItem()
'Set the barcode symbology to Code 128
bcItem.Symbology = Neodynamic.SDK.Printing.BarcodeSymbology.Code128
'Set the value to encode i.e the user's product id
bcItem.Code = this.TextBox1.Text
'Set barcode item location on the label in CM
bcItem.X = 0.5
bcItem.Y = 0.5
'Set barcode bars size in CM
bcItem.BarWidth = 0.025
bcItem.BarHeight = 2
'Add items to the label
tLabel.Items.Add(bcItem)
'Create a PrintJob object
Dim pj As New Neodynamic.SDK.Printing.PrintJob()
'Thermal Printer is connected through USB
pj.PrinterSettings.Communication.CommunicationType = Neodynamic.SDK.Printing.CommunicationType.USB
'Set Thermal Printer resolution
pj.PrinterSettings.Dpi = 203
'Set Thermal Printer language
pj.PrinterSettings.ProgrammingLanguage = Neodynamic.SDK.Printing.ProgrammingLanguage.ZPL
'Set Thermal Printer name
pj.PrinterSettings.PrinterName = "Zebra GK420t"
'Set number of copies...
pj.Copies = 1
'Print ThermalLabel object...
pj.Print(tLabel)
For EPL-based Printers
Visual Basic .NET
'Define a ThermalLabel object and set unit to cm and label size
Dim tLabel As New Neodynamic.SDK.Printing.ThermalLabel(Neodynamic.SDK.Printing.UnitType.Cm, 6, 0)
'Define a BarcodeItem...
Dim bcItem As New Neodynamic.SDK.Printing.BarcodeItem()
'Set the barcode symbology to Code 128
bcItem.Symbology = Neodynamic.SDK.Printing.BarcodeSymbology.Code128
'Set the value to encode i.e the user's product id
bcItem.Code = this.TextBox1.Text
'Set barcode item location on the label in CM
bcItem.X = 0.5
bcItem.Y = 0.5
'Set barcode bars size in CM
bcItem.BarWidth = 0.025
bcItem.BarHeight = 2
'Add items to the label
tLabel.Items.Add(bcItem)
'Create a PrintJob object
Dim pj As New Neodynamic.SDK.Printing.PrintJob()
'Thermal Printer is connected through USB
pj.PrinterSettings.Communication.CommunicationType = Neodynamic.SDK.Printing.CommunicationType.USB
'Set Thermal Printer resolution
pj.PrinterSettings.Dpi = 203
'Set Thermal Printer language
pj.PrinterSettings.ProgrammingLanguage = Neodynamic.SDK.Printing.ProgrammingLanguage.EPL
'Set Thermal Printer name
pj.PrinterSettings.PrinterName = "Zebra GK420t"
'Set number of copies...
pj.Copies = 1
'Print ThermalLabel object...
pj.Print(tLabel)
- That's it. Test your application, fill the TextBox with some value (see the screenshot) and click on "Print Label..." button.
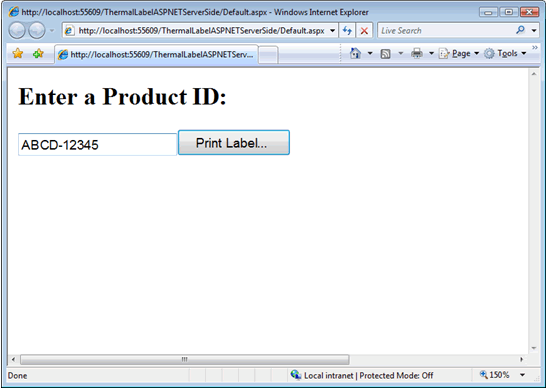
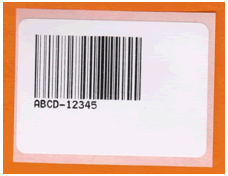
After clicking the "Print Label..." button the printer specified in your code should print out a label with a barcode like the following:
Links:
This Demo
More Demos
Download ThermalLabel SDK for .NET
More Information about Neodynamic ThermalLabel SDK for .NET
Neodynamic
.NET Components & Controls
Neodynamic
- Neodynamic ThermalLabel SDK 2.0 for .NET
- Microsoft .NET Framework 2.0 (or greater)
- Microsoft Visual Studio 2005 / 2008
- Microsoft Visual Web Developer Express 2005 / 2008
- Any Zebra Thermal Printer supporting ZPL (Zebra Programming Language) or EPL (Eltron Programming Language)
In an ASP.NET Web Application, Server-side printing means that the printing job takes place on the Server machine which is hosting and running our ASP.NET Web Application as is illustrated in the following figure.
In ASP.NET Server-side printing scenarios, a Thermal Printer is installed on the server machine (USB, Serial or Parallel ports) or it can be a standalone printer identified by an IP address. To print barcode thermal labels you create the label design and print it by using server side code (C# or VB.NET) and ThermalLabel SDK object model inside your ASPX web page.
In the following sample code, a simple ASP.NET (ASPX) web page is created displaying a TextBox and a Button. When the page is requested/viewed by a user, it will be able to enter a number to encode a product ID. When the user hits the submit button, a server side code is executed and a barcode label will be printed with a Thermal Printer installed on the server (in this sample an USB Thermal Printer)
IMPORTANT: To test the sample code you must have installed a Zebra ZPL-based or EPL-based thermal printer.
Follow these steps:
- Download and install latest version of Neodynamic ThermalLabel SDK for .NET
- Open Visual Studio 2005 /2008 or Visual Web Developer Express 2005 / 2008 and create an ASP.NET Web site using your preferred .NET language like VB or C#.
- Add a reference to Neodynamic.SDK.ThermalLabel.dll assembly. To do that, go to Website > Add Reference... and in the dialog box, look for the ThermalLabel SDK assembly. Click OK.
- Open the default.aspx WebForm and drag & drop a TextBox and a Button ASP.NET Server Controls. After that, please design the page so it looks like the following figure:
On the web page, double-click on the "Print Label..." button to add the printing code on the Click event.
IMPORTANT NOTICE
+ Although ThermalLabel SDK supports both ZPL and EPL printers, a label design you write using .NET code like C# or VB.NET will not produce the same output printing under ZPL and EPL printers. If you need to support both printer languages in your project then you will have to design two different labels targeting each printer language separately.
+ In the following code you will have to change the Thermal Printer settings like printer name, type of communication, DPI, printer programming language, etc. to match yours.
Remember that is a simple sample code. The following code will try to print a barcode on a thermal label encoding the product ID provided by the user on the ASP.NET web page.
For ZPL-based Printers
Visual Basic .NET
'Define a ThermalLabel object and set unit to cm and label size
Dim tLabel As New Neodynamic.SDK.Printing.ThermalLabel(Neodynamic.SDK.Printing.UnitType.Cm, 6, 0)
'Define a BarcodeItem...
Dim bcItem As New Neodynamic.SDK.Printing.BarcodeItem()
'Set the barcode symbology to Code 128
bcItem.Symbology = Neodynamic.SDK.Printing.BarcodeSymbology.Code128
'Set the value to encode i.e the user's product id
bcItem.Code = this.TextBox1.Text
'Set barcode item location on the label in CM
bcItem.X = 0.5
bcItem.Y = 0.5
'Set barcode bars size in CM
bcItem.BarWidth = 0.025
bcItem.BarHeight = 2
'Add items to the label
tLabel.Items.Add(bcItem)
'Create a PrintJob object
Dim pj As New Neodynamic.SDK.Printing.PrintJob()
'Thermal Printer is connected through USB
pj.PrinterSettings.Communication.CommunicationType = Neodynamic.SDK.Printing.CommunicationType.USB
'Set Thermal Printer resolution
pj.PrinterSettings.Dpi = 203
'Set Thermal Printer language
pj.PrinterSettings.ProgrammingLanguage = Neodynamic.SDK.Printing.ProgrammingLanguage.ZPL
'Set Thermal Printer name
pj.PrinterSettings.PrinterName = "Zebra GK420t"
'Set number of copies...
pj.Copies = 1
'Print ThermalLabel object...
pj.Print(tLabel)
For EPL-based Printers
Visual Basic .NET
'Define a ThermalLabel object and set unit to cm and label size
Dim tLabel As New Neodynamic.SDK.Printing.ThermalLabel(Neodynamic.SDK.Printing.UnitType.Cm, 6, 0)
'Define a BarcodeItem...
Dim bcItem As New Neodynamic.SDK.Printing.BarcodeItem()
'Set the barcode symbology to Code 128
bcItem.Symbology = Neodynamic.SDK.Printing.BarcodeSymbology.Code128
'Set the value to encode i.e the user's product id
bcItem.Code = this.TextBox1.Text
'Set barcode item location on the label in CM
bcItem.X = 0.5
bcItem.Y = 0.5
'Set barcode bars size in CM
bcItem.BarWidth = 0.025
bcItem.BarHeight = 2
'Add items to the label
tLabel.Items.Add(bcItem)
'Create a PrintJob object
Dim pj As New Neodynamic.SDK.Printing.PrintJob()
'Thermal Printer is connected through USB
pj.PrinterSettings.Communication.CommunicationType = Neodynamic.SDK.Printing.CommunicationType.USB
'Set Thermal Printer resolution
pj.PrinterSettings.Dpi = 203
'Set Thermal Printer language
pj.PrinterSettings.ProgrammingLanguage = Neodynamic.SDK.Printing.ProgrammingLanguage.EPL
'Set Thermal Printer name
pj.PrinterSettings.PrinterName = "Zebra GK420t"
'Set number of copies...
pj.Copies = 1
'Print ThermalLabel object...
pj.Print(tLabel)
- That's it. Test your application, fill the TextBox with some value (see the screenshot) and click on "Print Label..." button.
After clicking the "Print Label..." button the printer specified in your code should print out a label with a barcode like the following:
Links:
This Demo
More Demos
Download ThermalLabel SDK for .NET
More Information about Neodynamic ThermalLabel SDK for .NET
Neodynamic
.NET Components & Controls
Neodynamic
Last edited by a moderator: