Neodynamic
Well-known member
- Joined
- Dec 5, 2005
- Messages
- 137
- Programming Experience
- 10+
How to dynamically create composite images using embedded images in ASP.NET Resource RESX
Technologies used
- Neodynamic ImageDraw (2.0 or later) for ASP.NET
- Microsoft .NET Framework (2.0 or later)
- Microsoft Visual Studio .NET (2005 or later - Visual Web Developer Express Edition)
In the following guide you'll learn how to use images embedded into ASP.NET Resources Files (*.RESX) to create composite images through ImageDraw.
In this guide we'll use ASP.NET Resources Expression which is only available for ASP.NET 2.0 or later. Because that, we'll use Visual Studio 2005 (Visual Web Developer Express Edition can be use as well).
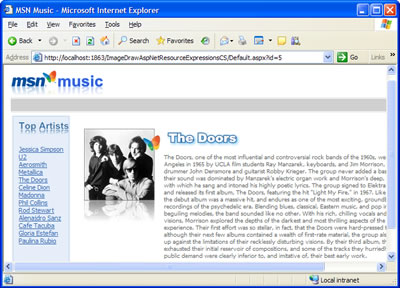
The idea behind this guide is to dynamically create Composite Images merging some static image files with other images which are embedded into resources files (*.RESX) for a fictitious MSN Music site. In this sample the MSN logo and the butterfly images are embedded into an ASP.NET Resource file. In addition, a predefined set of static images about Music Artists embedded into an XML file - stored in Base64 string format - are used to merge both and to get the output image. The following image tries to provide you with a preview of what we want to accomplish with this demo.

The original artist photo and MSN Logo images embedded into RESX file that will be merged to create the Music Website.
Follow these steps
1- Open VS 2005 and create a new Website.
2- The project will contain an XML file (artists.xml) with Music Artists info, included the Artist's photo in Base64 string format. The project also contains a global resource file called MsnResources.resx maintaining the MSN logo images embedded into it as is shown in the following figure.

All needed files are available for downloading at the end of this guide.
3- In this guide we'll only explain how to use an embedded image resource to get the following artist image:

The above image is a combination of:
a. An artist photo stored into an XML file in Base64 string format
b. An Image (MSN Butterfly) embedded into a resource (*.RESX) file
To get the sample image working follow these steps:
- Open the ASP.NET WebForm in Design View and drag and drop an ImageDraw control onto it.
- Open ImageDraw Visual Editor right-clicking on ImageDraw control and selecting ImageDraw Visual Editor. To learn more about ImageDraw Visual Editor please read it in the product help documentation or clicking on Help button on the Visual Editor form.
- Add an ImageElement - clicking on Image button - that will wrap the Artist photo. The setting will be done at code-behind reading the XML file.
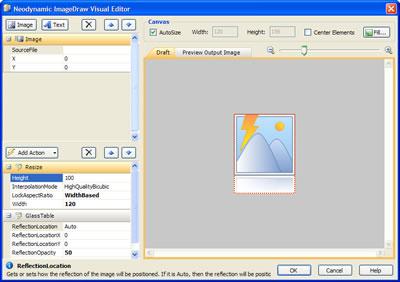
Select the ImageElement and then, on the bottom left pane click on Add Action button and select Resize. Select the Resize action and set these properties:
+ Width: 12
+ LockAspectRatio: WidthBased
This action will take the original artist photo and will resize it to a fixed width size (120). The new height will be automatically calculated at runtime because LockAspectRatio property was set to WidthBased. Resize action is very flexible and you can learn more about it going to the product help documentation.
Add another action for the ImageElement clicking on Add Action button and selecting GlassTable (Reflection) from the action list. Select the GlassTable action and set these properties:
+ ReflectionOpacity: 50
+ ReflectionPercentage: 30
- This action will take the resized artist photo and will add a reflection effect below it. Just as for Resize, GlassTable action is very flexible and you can learn more about it going to the product help documentation.

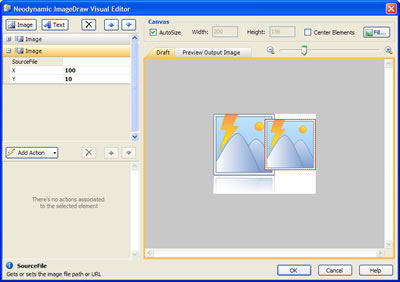
- The last element is for the Embedded MSN Butterfly image. Add another ImageElement.
Select the ImageElement on the left pane and set these properties:
+ X: 100
+ Y: 10

- That's it. Click on OK button to close the ImageDraw Visual Editor.
- Next step is setting up the Resource Expression stuff. Change to Source View, locate the last ImageElement and set SourceImage property as is shown below:
SourceImage="<%$ Resources:MsnResources, butterfly %>"
where:
+ MsnResources is the name of the RESX file
+ butterfly is the name of the butterfly image into the RESX file
You should get the following ASP.NET HTML code for the ImageDraw control.
<neoimg:ImageDraw ID="ImageDraw3" runat="server" CacheExpiresAtDateTime="" ColorDepth="Format32bpp"
ImageFormat="Jpeg" JpegCompressionLevel="95" EnableViewState="False">
<Elements>
<neoimg:ImageElement Source="File">
<Actions>
<neoimg:Resize LockAspectRatio="WidthBased" Width="120" />
<neoimg:GlassTable ReflectionPercentage="30" ReflectionOpacity="50" />
</Actions>
</neoimg:ImageElement>
<neoimg:ImageElement Source="Image" SourceImage="<%$ Resources:MsnResources, butterfly %>" X="100" Y="10">
</neoimg:ImageElement>
</Elements>
<Canvas Height="156" Width="200" />
</neoimg:ImageDraw>
4- There are more settings to be done for this demo but the previous steps are all what you need to know for using Images embedded into a Resource (*.RESX) file. Please, download the sample files at the end of this guide to get it completed.
5- If you run the application, you should get something like this.

The Artist photo with the MSN Butterfly logo embedded into a RESX file, both merged using ImageDraw
Links:
This Demo
More Demos
Download ImageDraw for ASP.NET
More Information about Neodynamic ImageDraw for ASP.NET
Neodynamic
.NET Components & Controls
Neodynamic
Neodynamic Image Draw for ASP.NET
Technologies used
- Neodynamic ImageDraw (2.0 or later) for ASP.NET
- Microsoft .NET Framework (2.0 or later)
- Microsoft Visual Studio .NET (2005 or later - Visual Web Developer Express Edition)
In the following guide you'll learn how to use images embedded into ASP.NET Resources Files (*.RESX) to create composite images through ImageDraw.
In this guide we'll use ASP.NET Resources Expression which is only available for ASP.NET 2.0 or later. Because that, we'll use Visual Studio 2005 (Visual Web Developer Express Edition can be use as well).
The idea behind this guide is to dynamically create Composite Images merging some static image files with other images which are embedded into resources files (*.RESX) for a fictitious MSN Music site. In this sample the MSN logo and the butterfly images are embedded into an ASP.NET Resource file. In addition, a predefined set of static images about Music Artists embedded into an XML file - stored in Base64 string format - are used to merge both and to get the output image. The following image tries to provide you with a preview of what we want to accomplish with this demo.

The original artist photo and MSN Logo images embedded into RESX file that will be merged to create the Music Website.
Follow these steps
1- Open VS 2005 and create a new Website.
2- The project will contain an XML file (artists.xml) with Music Artists info, included the Artist's photo in Base64 string format. The project also contains a global resource file called MsnResources.resx maintaining the MSN logo images embedded into it as is shown in the following figure.

All needed files are available for downloading at the end of this guide.
3- In this guide we'll only explain how to use an embedded image resource to get the following artist image:

The above image is a combination of:
a. An artist photo stored into an XML file in Base64 string format
b. An Image (MSN Butterfly) embedded into a resource (*.RESX) file
To get the sample image working follow these steps:
- Open the ASP.NET WebForm in Design View and drag and drop an ImageDraw control onto it.
- Open ImageDraw Visual Editor right-clicking on ImageDraw control and selecting ImageDraw Visual Editor. To learn more about ImageDraw Visual Editor please read it in the product help documentation or clicking on Help button on the Visual Editor form.
- Add an ImageElement - clicking on Image button - that will wrap the Artist photo. The setting will be done at code-behind reading the XML file.
Select the ImageElement and then, on the bottom left pane click on Add Action button and select Resize. Select the Resize action and set these properties:
+ Width: 12
+ LockAspectRatio: WidthBased
This action will take the original artist photo and will resize it to a fixed width size (120). The new height will be automatically calculated at runtime because LockAspectRatio property was set to WidthBased. Resize action is very flexible and you can learn more about it going to the product help documentation.
Add another action for the ImageElement clicking on Add Action button and selecting GlassTable (Reflection) from the action list. Select the GlassTable action and set these properties:
+ ReflectionOpacity: 50
+ ReflectionPercentage: 30
- This action will take the resized artist photo and will add a reflection effect below it. Just as for Resize, GlassTable action is very flexible and you can learn more about it going to the product help documentation.

- The last element is for the Embedded MSN Butterfly image. Add another ImageElement.
Select the ImageElement on the left pane and set these properties:
+ X: 100
+ Y: 10

- That's it. Click on OK button to close the ImageDraw Visual Editor.
- Next step is setting up the Resource Expression stuff. Change to Source View, locate the last ImageElement and set SourceImage property as is shown below:
SourceImage="<%$ Resources:MsnResources, butterfly %>"
where:
+ MsnResources is the name of the RESX file
+ butterfly is the name of the butterfly image into the RESX file
You should get the following ASP.NET HTML code for the ImageDraw control.
<neoimg:ImageDraw ID="ImageDraw3" runat="server" CacheExpiresAtDateTime="" ColorDepth="Format32bpp"
ImageFormat="Jpeg" JpegCompressionLevel="95" EnableViewState="False">
<Elements>
<neoimg:ImageElement Source="File">
<Actions>
<neoimg:Resize LockAspectRatio="WidthBased" Width="120" />
<neoimg:GlassTable ReflectionPercentage="30" ReflectionOpacity="50" />
</Actions>
</neoimg:ImageElement>
<neoimg:ImageElement Source="Image" SourceImage="<%$ Resources:MsnResources, butterfly %>" X="100" Y="10">
</neoimg:ImageElement>
</Elements>
<Canvas Height="156" Width="200" />
</neoimg:ImageDraw>
4- There are more settings to be done for this demo but the previous steps are all what you need to know for using Images embedded into a Resource (*.RESX) file. Please, download the sample files at the end of this guide to get it completed.
5- If you run the application, you should get something like this.

The Artist photo with the MSN Butterfly logo embedded into a RESX file, both merged using ImageDraw
Links:
This Demo
More Demos
Download ImageDraw for ASP.NET
More Information about Neodynamic ImageDraw for ASP.NET
Neodynamic
.NET Components & Controls
Neodynamic
Neodynamic Image Draw for ASP.NET
