Neodynamic
Well-known member
- Joined
- Dec 5, 2005
- Messages
- 137
- Programming Experience
- 10+
How to add Barcode in Local Reports (RDLC) before report rendering stage - ASP.NET Product List Sample with PDF & Excel support
Prerequisites
- Neodynamic Barcode Professional 3.0 (or greater) for Reporting Services
- Microsoft .NET Framework 2.0 (or greater)
- Microsoft Visual Studio 2005 or Visual Web Developer 2005 Express Edition. NOTE: For VWD Express Edition, installing the free add-in for ReportViewer[url] is mandatory.
- Microsoft SQL Server 2005 (any version) with AdventureWorks Database sample installed
In the following Step-By-Step Guide we'll create a local report (RDLC file) which features barcoding capabilities by using Barcode Professional for Reporting Services.
Follow these steps:
- Open Visual Studio and create a new ASP.NET Website naming it LocalReportWithBarcode.
- Report's Data Source settings
Data can be supplied to Local Reports either as custom Objects or as ADO.NET DataTables. In this guide we'll be exploring each data source scenario in details. So please choose the data source scenario you want to use first and then follow the steps for each of them:
+ [url=http://www.neodynamic.com/ND/FaqsTipsTricks.aspx?tabid=66&prodid=7&sid=78#1#1]Using ADO.NET DataTables as data source of my local report
+ Using Custom Objects as data source of my local report
Using ADO.NET DataTables as data source of my local report
Follow these steps:
- Add a new DataSet item to the project and name it AdventureWorks.xsd
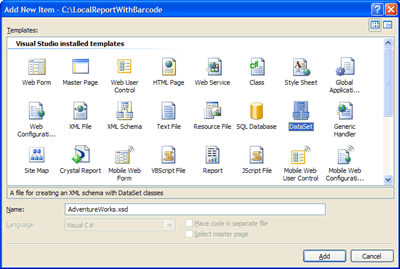
Click Add button. You will be asked if you want to place the AdventureWorks.xsd file in the App_Code directory. Answer yes.
After that, the TableAdapter Configuration Wizard is automatically launched so please follow its steps.
In the first step, please create a connection to the AdventureWorks SQL Server Database sample and click Next. In the second step, choose "Use SQL statements" and click Next. After that, please enter the following SQL Statement:
SELECT ProductID, Name, ProductModel FROM Production.vProductAndDescription WHERE (CultureID = N'en')
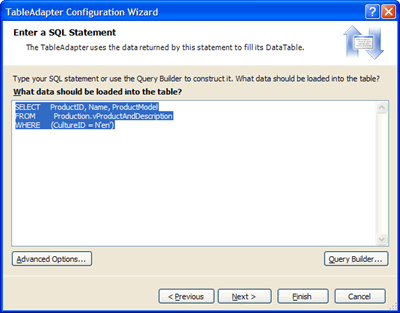
Finally click Finish to close the wizard dialog box.
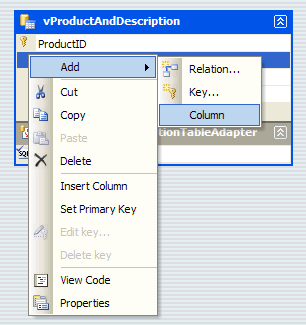
- After that, add a new custom Column to the DataTable just created and name it Barcode as is shown in the following figure
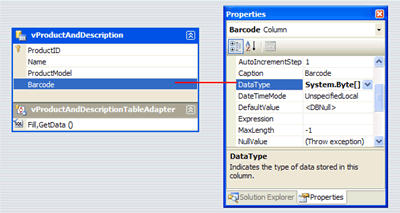
- Change the data type of the Barcode column to System.Byte[] (Array of Byte). NOTE: the System.Byte[] data type is not listed and thus why you must type it manually.
- Save the AdventureWorks.xsd file.
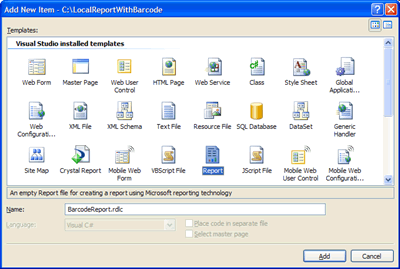
- Now add a new Report item to the project and name it BarcodeReport.rdlc
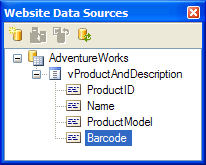
- The data source for the report should look like the following figure. NOTE: You can display Data Sources Window by selecting Data menu and then Show Data Sources (Shift+Alt+D)
- Please design the report so it looks like the following figure.
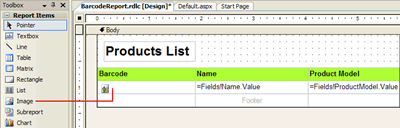
The report features a Table item with 3 columns:
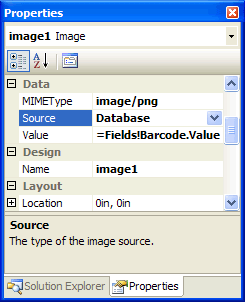
1º Column: It holds an Image item. Drag & drop an Image item into it and set its properties as is shown in the following figure. Notice that Value property of the Image item is bound to the Barcode column.
2º Column: It holds the Name field
3º Column: It holds the ProductModel field
- Save the report.
- Now Create/Open an ASP.NET WebForm at design time and drag & drop a ReportViewer control onto it. NOTE: DO NOT select any report to display. We'll set up it by code next.
- After that, from the Solution Explorer, add a reference to Barcode Professional for Reporting Services assembly (By default it is located in [BarcodeInstallDir]\Bin\For SSRS 2005\Neodynamic.ReportingServices.Barcode.dll)
- Write the following code in the Page_Load event procedure.
Visual Basic .NET
Protected Sub Page_Load(ByVal sender As Object, ByVal e As System.EventArgs) Handles Me.Load
Protected Sub Page_Load(ByVal sender As Object, ByVal e As System.EventArgs) Handles Me.Load
'Fill the datasource from DB
Dim ta As New AdventureWorksTableAdapters.vProductAndDescriptionTableAdapter()
Dim dt As New AdventureWorks.vProductAndDescriptionDataTable()
ta.Fill(dt)
'Create an instance of Barcode Professional
Dim bcp As New Neodynamic.ReportingServices.Barcode()
'Barcode settings
bcp.AutoSize = True
bcp.Symbology = Neodynamic.ReportingServices.Symbology.Code128
bcp.BarHeight = 0.25F
'Update DataTable with barcode image
Dim row As AdventureWorks.vProductAndDescriptionRow
For Each row In dt.Rows
'Set the value to encode
bcp.Code = row.ProductID.ToString()
'Generate the barcode image and store it into the Barcode Column
row.Barcode = bcp.GetBarcodeImagePng()
Next
'Create Report Data Source
Dim rptDataSource As New Microsoft.Reporting.WebForms.ReportDataSource("AdventureWorks_vProductAndDescription", dt)
Me.ReportViewer1.LocalReport.DataSources.Add(rptDataSource)
Me.ReportViewer1.LocalReport.ReportPath = Server.MapPath("BarcodeReport.rdlc")
Me.ReportViewer1.LocalReport.Refresh()
End Sub
- That's it. Run your application. You should get the barcode images displayed on the report.
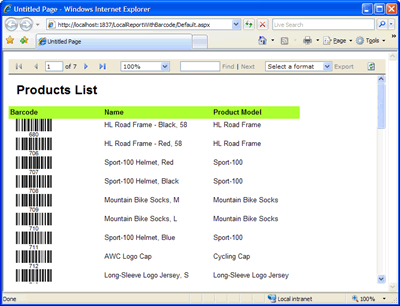
- That's it. Run your application. You should get the barcode images displayed on the report.
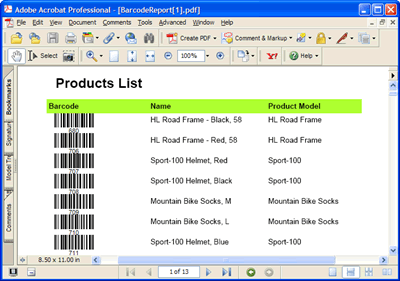
ReportViewer control lets you to export the displayed report to Acrobat PDF as well as Microsoft Excel XLS. In both cases the barcode images are maintained.
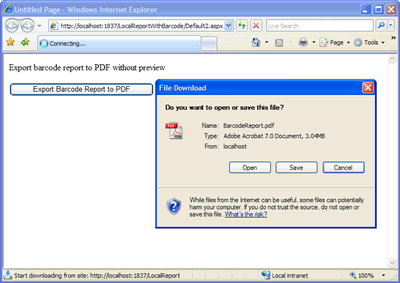
TIP: How to export to Acrobat PDF the Local Report with Barcode images without Preview
The following walkthrough shows how to programmatically export a local report to PDF without viewing it.
Follow these steps:
- Add a new ASP.NET WebForm to the project and drag & drop a Button control onto it.
- Be sure your project is referencing the following assemblies:
Microsoft.ReportViewer.Common.dll
Microsoft.ReportViewer.WebForms.dll
Neodynamic.ReportingServices.Barcode.dll
- Double click on the Button control and write the following code in the Button1_Click event procedure.
Visual Basic .NET
Protected Sub Button1_Click(ByVal sender As Object, ByVal e As System.EventArgs) Handles Me.Button1.Click
'Fill the datasource from DB
Dim ta As New AdventureWorksTableAdapters.vProductAndDescriptionTableAdapter()
Dim dt As New AdventureWorks.vProductAndDescriptionDataTable()
ta.Fill(dt)
'Create an instance of Barcode Professional
Dim bcp As New Neodynamic.ReportingServices.Barcode()
'Barcode settings
bcp.AutoSize = True
bcp.Symbology = Neodynamic.ReportingServices.Symbology.Code128
bcp.BarHeight = 0.25F
'Update DataTable with barcode image
Dim row As AdventureWorks.vProductAndDescriptionRow
For Each row In dt.Rows
'Set the value to encode
bcp.Code = row.ProductID.ToString()
'Generate the barcode image and store it into the Barcode Column
row.Barcode = bcp.GetBarcodeImagePng()
Next
'Create ReportViewer
Dim viewer As New Microsoft.Reporting.WebForms.ReportViewer()
'Create Report Data Source
Dim rptDataSource As New Microsoft.Reporting.WebForms.ReportDataSource("AdventureWorks_vProductAndDescription", dt)
viewer.LocalReport.DataSources.Add(rptDataSource)
viewer.LocalReport.ReportPath = Server.MapPath("BarcodeReport.rdlc")
'Export to PDF
Dim pdfContent As Byte() = viewer.LocalReport.Render("PDF", Nothing, Nothing, Nothing, Nothing, Nothing, Nothing)
'Return PDF
Me.Response.Clear()
Me.Response.ContentType = "application/pdf"
Me.Response.AddHeader("Content-disposition", "attachment; filename=BarcodeReport.pdf")
Me.Response.BinaryWrite(pdfContent)
Me.Response.End()
End Sub
- That's it. Run your project opening the last WebForm and click on the button to generate the PDF version for the barcode report.
Using Custom Objects as data source of my local report
You can design local reports (RDLC) based on business objects defined in your application. In this scenario, an object data source is simply a collection of arbitrary objects. In this guide, we'll define a custom object with barcoding support that will be used as data source for our report.
Follow these steps:
- Add a new class item to the project and name it Product.
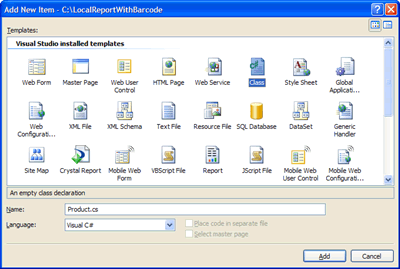
You will be asked if you want to place the class file in the App_Code directory. Answer yes.
The Product class will feature basic info about products such is ID and Name as well as a special property called Barcode which will hold the barcode image for each product object.
Please write the following Product class definition:
Visual Basic .NET
Public Class Product
Dim m_id As String
Dim m_name As String
Dim m_barcode As Byte()
Public Sub New(ByVal id As String, ByVal name As String, ByVal barcode As Byte())
m_id = id
m_name = name
m_barcode = barcode
End Sub
Public Property Id() As String
Get
Return m_id
End Get
Set(ByVal value As String)
m_id = value
End Set
End Property
Public Property Name() As String
Get
Return m_name
End Get
Set(ByVal value As String)
m_name = value
End Set
End Property
Public Property Barcode() As Byte()
Get
Return m_barcode
End Get
Set(ByVal value As Byte())
m_barcode = value
End Set
End Property
End Class
- Add another new class item to the project and name it Catalog. This new class Catalog will be used as the object data source for our report. NOTE: In order for a class to qualify as an object data source, there should be a "Select method" that returns a collection of objects of the involved class and thus why we'll create this Catalog class.

You will be asked if you want to place the class file in the App_Code directory. Answer yes.
The Catalog class will allow us to add Product objects and features a "Select method" called GetProducts which returns a strongly typed collection of Product objects.
Please write the following Catalog class definition:
Visual Basic .NET
Public Class Catalog
Dim m_products As System.Collections.Generic.List(Of Product)
Public Sub New()
m_products = New System.Collections.Generic.List(Of Product)
End Sub
Public Sub AddProduct(ByVal product As Product)
m_products.Add(product)
End Sub
Public Function GetProducts() As System.Collections.Generic.List(Of Product)
Return m_products
End Function
End Class
- Save the class file and go to Build menu and click on Build Solution
- Now add a new Report item to the project and name it BarcodeReport.rdlc
- The data source for the report should look like the following figure. NOTE: You can display Data Sources Window by selecting Data menu and then Show Data Sources (Shift+Alt+D)
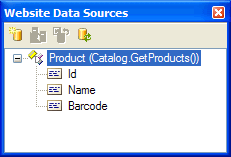
- Please design the report so it looks like the following figure.
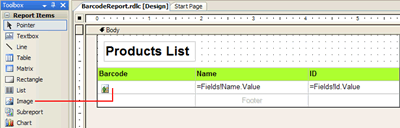
The report features a Table item with 3 columns:
1º Column: It holds an Image item. Drag & drop an Image item into it and set its properties as is shown in the following figure. Notice that Value property of the Image item is bound to the Barcode column.
2º Column: It holds the Name field
3º Column: It holds the Id field
- Save the report.
- Create/Open an ASP.NET WebForm at design time and drag & drop a ReportViewer control. NOTE: DO NOT select any report to display. We'll set up it by code next.
- After that, from the Solution Explorer, add a reference to Barcode Professional for Reporting Services assembly (By default it is located in [BarcodeInstallDir]\Bin\For SSRS 2005\Neodynamic.ReportingServices.Barcode.dll)
- Write the following code in the Page_Load event procedure.
Visual Basic .NET
Protected Sub Page_Load(ByVal sender As Object, ByVal e As System.EventArgs) Handles Me.Load
'Create an instance of Barcode Professional
Dim bcp As New Neodynamic.ReportingServices.Barcode()
'Barcode settings
bcp.AutoSize = True
bcp.Symbology = Neodynamic.ReportingServices.Symbology.Code128
bcp.BarHeight = 0.25F
'Fill the object datasource.
'NOTE: You may connect to a SQL Server Database and create Product objects based on data returned from such source.
Dim data As New Catalog()
'Create random product info
Dim prodId As String
Dim prodName As String
Dim prodBarcode As Byte()
Dim i As Integer
For i = 1 To 10
'Random product info
prodId = Guid.NewGuid().ToString().Substring(0, 10)
prodName = "Product " + prodId
'Set the value to encode
bcp.Code = prodId
'Generate the barcode image and store it into the Barcode Column
prodBarcode = bcp.GetBarcodeImagePng()
'Add new product
data.AddProduct(New Product(prodId, prodName, prodBarcode))
Next
'Create Report Data Source
Dim rptDataSource As New Microsoft.Reporting.WebForms.ReportDataSource("Product", data.GetProducts())
Me.ReportViewer1.LocalReport.DataSources.Add(rptDataSource)
Me.ReportViewer1.LocalReport.ReportPath = Server.MapPath("BarcodeReport.rdlc")
Me.ReportViewer1.LocalReport.Refresh()
End Sub
- That's it. Run your application. You should get the barcode images displayed on the report.
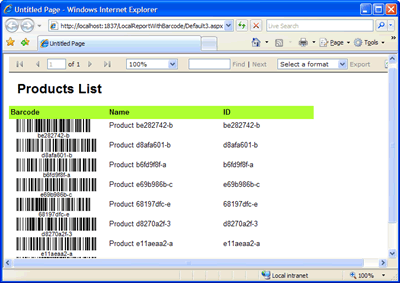
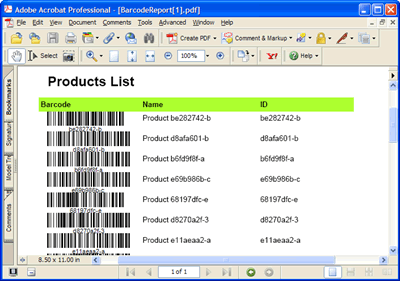
ReportViewer control lets you to export the displayed report to Acrobat PDF as well as Microsoft Excel XLS. In both cases the barcode images are maintained.
TIP: How to export to Acrobat PDF the Local Report with Barcode images without Preview
The following walkthrough shows how to programmatically export a local report to PDF without viewing it.
- Add a new ASP.NET WebForm to the project and drag & drop a Button control onto it.
- Be sure your project is referencing the following assemblies:
Microsoft.ReportViewer.Common.dll
Microsoft.ReportViewer.WebForms.dll
Neodynamic.ReportingServices.Barcode.dll
- Double click on the Button control and write the following code in the Button1_Click event procedure.
Visual Basic .NET
Private Sub Button1_Click(ByVal sender As Object, ByVal e As System.EventArgs) Handles Me.Button1.Click
'Create an instance of Barcode Professional
Dim bcp As New Neodynamic.ReportingServices.Barcode()
'Barcode settings
bcp.AutoSize = True
bcp.Symbology = Neodynamic.ReportingServices.Symbology.Code128
bcp.BarHeight = 0.25F
'Fill the object datasource.
'NOTE: You may connect to a SQL Server Database and create Product objects based on data returned from such source.
Dim data As New Catalog()
'Create random product info
Dim prodId As String
Dim prodName As String
Dim prodBarcode As Byte()
Dim i As Integer
For i = 1 To 10
'Random product info
prodId = Guid.NewGuid().ToString().Substring(0, 10)
prodName = "Product " + prodId
'Set the value to encode
bcp.Code = prodId
'Generate the barcode image and store it into the Barcode Column
prodBarcode = bcp.GetBarcodeImagePng()
'Add new product
data.AddProduct(New Product(prodId, prodName, prodBarcode))
Next
'Create ReportViewer
Dim viewer As New Microsoft.Reporting.WebForms.ReportViewer()
'Create Report Data Source
Dim rptDataSource As New Microsoft.Reporting.WebForms.ReportDataSource("Product", data.GetProducts())
viewer.LocalReport.DataSources.Add(rptDataSource)
viewer.LocalReport.ReportPath = Server.MapPath("BarcodeReport.rdlc")
'Export to PDF
Dim pdfContent As Byte() = viewer.LocalReport.Render("PDF", Nothing, Nothing, Nothing, Nothing, Nothing, Nothing)
'Return PDF
Me.Response.Clear()
Me.Response.ContentType = "application/pdf"
Me.Response.AddHeader("Content-disposition", "attachment; filename=BarcodeReport.pdf")
Me.Response.BinaryWrite(pdfContent)
Me.Response.End()
End Sub
- That's it. Run your project opening the last WebForm and click on the button to generate the PDF version for the barcode report.
Links:
This Demo
More Demos
Download Barcode Professional for Reporting Services
More Information about Neodynamic Barcode Professional for Reporting Services
Neodynamic
.NET Components & Controls
Neodynamic
Neodynamic Barcode Professional for Reporting Services
Prerequisites
- Neodynamic Barcode Professional 3.0 (or greater) for Reporting Services
- Microsoft .NET Framework 2.0 (or greater)
- Microsoft Visual Studio 2005 or Visual Web Developer 2005 Express Edition. NOTE: For VWD Express Edition, installing the free add-in for ReportViewer[url] is mandatory.
- Microsoft SQL Server 2005 (any version) with AdventureWorks Database sample installed
In the following Step-By-Step Guide we'll create a local report (RDLC file) which features barcoding capabilities by using Barcode Professional for Reporting Services.
Follow these steps:
- Open Visual Studio and create a new ASP.NET Website naming it LocalReportWithBarcode.
- Report's Data Source settings
Data can be supplied to Local Reports either as custom Objects or as ADO.NET DataTables. In this guide we'll be exploring each data source scenario in details. So please choose the data source scenario you want to use first and then follow the steps for each of them:
+ [url=http://www.neodynamic.com/ND/FaqsTipsTricks.aspx?tabid=66&prodid=7&sid=78#1#1]Using ADO.NET DataTables as data source of my local report
+ Using Custom Objects as data source of my local report
Using ADO.NET DataTables as data source of my local report
Follow these steps:
- Add a new DataSet item to the project and name it AdventureWorks.xsd
Click Add button. You will be asked if you want to place the AdventureWorks.xsd file in the App_Code directory. Answer yes.
After that, the TableAdapter Configuration Wizard is automatically launched so please follow its steps.
In the first step, please create a connection to the AdventureWorks SQL Server Database sample and click Next. In the second step, choose "Use SQL statements" and click Next. After that, please enter the following SQL Statement:
SELECT ProductID, Name, ProductModel FROM Production.vProductAndDescription WHERE (CultureID = N'en')
Finally click Finish to close the wizard dialog box.
- After that, add a new custom Column to the DataTable just created and name it Barcode as is shown in the following figure
- Change the data type of the Barcode column to System.Byte[] (Array of Byte). NOTE: the System.Byte[] data type is not listed and thus why you must type it manually.
- Save the AdventureWorks.xsd file.
- Now add a new Report item to the project and name it BarcodeReport.rdlc
- The data source for the report should look like the following figure. NOTE: You can display Data Sources Window by selecting Data menu and then Show Data Sources (Shift+Alt+D)
- Please design the report so it looks like the following figure.
The report features a Table item with 3 columns:
1º Column: It holds an Image item. Drag & drop an Image item into it and set its properties as is shown in the following figure. Notice that Value property of the Image item is bound to the Barcode column.
2º Column: It holds the Name field
3º Column: It holds the ProductModel field
- Save the report.
- Now Create/Open an ASP.NET WebForm at design time and drag & drop a ReportViewer control onto it. NOTE: DO NOT select any report to display. We'll set up it by code next.
- After that, from the Solution Explorer, add a reference to Barcode Professional for Reporting Services assembly (By default it is located in [BarcodeInstallDir]\Bin\For SSRS 2005\Neodynamic.ReportingServices.Barcode.dll)
- Write the following code in the Page_Load event procedure.
Visual Basic .NET
Protected Sub Page_Load(ByVal sender As Object, ByVal e As System.EventArgs) Handles Me.Load
Protected Sub Page_Load(ByVal sender As Object, ByVal e As System.EventArgs) Handles Me.Load
'Fill the datasource from DB
Dim ta As New AdventureWorksTableAdapters.vProductAndDescriptionTableAdapter()
Dim dt As New AdventureWorks.vProductAndDescriptionDataTable()
ta.Fill(dt)
'Create an instance of Barcode Professional
Dim bcp As New Neodynamic.ReportingServices.Barcode()
'Barcode settings
bcp.AutoSize = True
bcp.Symbology = Neodynamic.ReportingServices.Symbology.Code128
bcp.BarHeight = 0.25F
'Update DataTable with barcode image
Dim row As AdventureWorks.vProductAndDescriptionRow
For Each row In dt.Rows
'Set the value to encode
bcp.Code = row.ProductID.ToString()
'Generate the barcode image and store it into the Barcode Column
row.Barcode = bcp.GetBarcodeImagePng()
Next
'Create Report Data Source
Dim rptDataSource As New Microsoft.Reporting.WebForms.ReportDataSource("AdventureWorks_vProductAndDescription", dt)
Me.ReportViewer1.LocalReport.DataSources.Add(rptDataSource)
Me.ReportViewer1.LocalReport.ReportPath = Server.MapPath("BarcodeReport.rdlc")
Me.ReportViewer1.LocalReport.Refresh()
End Sub
- That's it. Run your application. You should get the barcode images displayed on the report.
- That's it. Run your application. You should get the barcode images displayed on the report.
ReportViewer control lets you to export the displayed report to Acrobat PDF as well as Microsoft Excel XLS. In both cases the barcode images are maintained.
TIP: How to export to Acrobat PDF the Local Report with Barcode images without Preview
The following walkthrough shows how to programmatically export a local report to PDF without viewing it.
Follow these steps:
- Add a new ASP.NET WebForm to the project and drag & drop a Button control onto it.
- Be sure your project is referencing the following assemblies:
Microsoft.ReportViewer.Common.dll
Microsoft.ReportViewer.WebForms.dll
Neodynamic.ReportingServices.Barcode.dll
- Double click on the Button control and write the following code in the Button1_Click event procedure.
Visual Basic .NET
Protected Sub Button1_Click(ByVal sender As Object, ByVal e As System.EventArgs) Handles Me.Button1.Click
'Fill the datasource from DB
Dim ta As New AdventureWorksTableAdapters.vProductAndDescriptionTableAdapter()
Dim dt As New AdventureWorks.vProductAndDescriptionDataTable()
ta.Fill(dt)
'Create an instance of Barcode Professional
Dim bcp As New Neodynamic.ReportingServices.Barcode()
'Barcode settings
bcp.AutoSize = True
bcp.Symbology = Neodynamic.ReportingServices.Symbology.Code128
bcp.BarHeight = 0.25F
'Update DataTable with barcode image
Dim row As AdventureWorks.vProductAndDescriptionRow
For Each row In dt.Rows
'Set the value to encode
bcp.Code = row.ProductID.ToString()
'Generate the barcode image and store it into the Barcode Column
row.Barcode = bcp.GetBarcodeImagePng()
Next
'Create ReportViewer
Dim viewer As New Microsoft.Reporting.WebForms.ReportViewer()
'Create Report Data Source
Dim rptDataSource As New Microsoft.Reporting.WebForms.ReportDataSource("AdventureWorks_vProductAndDescription", dt)
viewer.LocalReport.DataSources.Add(rptDataSource)
viewer.LocalReport.ReportPath = Server.MapPath("BarcodeReport.rdlc")
'Export to PDF
Dim pdfContent As Byte() = viewer.LocalReport.Render("PDF", Nothing, Nothing, Nothing, Nothing, Nothing, Nothing)
'Return PDF
Me.Response.Clear()
Me.Response.ContentType = "application/pdf"
Me.Response.AddHeader("Content-disposition", "attachment; filename=BarcodeReport.pdf")
Me.Response.BinaryWrite(pdfContent)
Me.Response.End()
End Sub
- That's it. Run your project opening the last WebForm and click on the button to generate the PDF version for the barcode report.
Using Custom Objects as data source of my local report
You can design local reports (RDLC) based on business objects defined in your application. In this scenario, an object data source is simply a collection of arbitrary objects. In this guide, we'll define a custom object with barcoding support that will be used as data source for our report.
Follow these steps:
- Add a new class item to the project and name it Product.
You will be asked if you want to place the class file in the App_Code directory. Answer yes.
The Product class will feature basic info about products such is ID and Name as well as a special property called Barcode which will hold the barcode image for each product object.
Please write the following Product class definition:
Visual Basic .NET
Public Class Product
Dim m_id As String
Dim m_name As String
Dim m_barcode As Byte()
Public Sub New(ByVal id As String, ByVal name As String, ByVal barcode As Byte())
m_id = id
m_name = name
m_barcode = barcode
End Sub
Public Property Id() As String
Get
Return m_id
End Get
Set(ByVal value As String)
m_id = value
End Set
End Property
Public Property Name() As String
Get
Return m_name
End Get
Set(ByVal value As String)
m_name = value
End Set
End Property
Public Property Barcode() As Byte()
Get
Return m_barcode
End Get
Set(ByVal value As Byte())
m_barcode = value
End Set
End Property
End Class
- Add another new class item to the project and name it Catalog. This new class Catalog will be used as the object data source for our report. NOTE: In order for a class to qualify as an object data source, there should be a "Select method" that returns a collection of objects of the involved class and thus why we'll create this Catalog class.
You will be asked if you want to place the class file in the App_Code directory. Answer yes.
The Catalog class will allow us to add Product objects and features a "Select method" called GetProducts which returns a strongly typed collection of Product objects.
Please write the following Catalog class definition:
Visual Basic .NET
Public Class Catalog
Dim m_products As System.Collections.Generic.List(Of Product)
Public Sub New()
m_products = New System.Collections.Generic.List(Of Product)
End Sub
Public Sub AddProduct(ByVal product As Product)
m_products.Add(product)
End Sub
Public Function GetProducts() As System.Collections.Generic.List(Of Product)
Return m_products
End Function
End Class
- Save the class file and go to Build menu and click on Build Solution
- Now add a new Report item to the project and name it BarcodeReport.rdlc
- The data source for the report should look like the following figure. NOTE: You can display Data Sources Window by selecting Data menu and then Show Data Sources (Shift+Alt+D)
- Please design the report so it looks like the following figure.
The report features a Table item with 3 columns:
1º Column: It holds an Image item. Drag & drop an Image item into it and set its properties as is shown in the following figure. Notice that Value property of the Image item is bound to the Barcode column.
2º Column: It holds the Name field
3º Column: It holds the Id field
- Save the report.
- Create/Open an ASP.NET WebForm at design time and drag & drop a ReportViewer control. NOTE: DO NOT select any report to display. We'll set up it by code next.
- After that, from the Solution Explorer, add a reference to Barcode Professional for Reporting Services assembly (By default it is located in [BarcodeInstallDir]\Bin\For SSRS 2005\Neodynamic.ReportingServices.Barcode.dll)
- Write the following code in the Page_Load event procedure.
Visual Basic .NET
Protected Sub Page_Load(ByVal sender As Object, ByVal e As System.EventArgs) Handles Me.Load
'Create an instance of Barcode Professional
Dim bcp As New Neodynamic.ReportingServices.Barcode()
'Barcode settings
bcp.AutoSize = True
bcp.Symbology = Neodynamic.ReportingServices.Symbology.Code128
bcp.BarHeight = 0.25F
'Fill the object datasource.
'NOTE: You may connect to a SQL Server Database and create Product objects based on data returned from such source.
Dim data As New Catalog()
'Create random product info
Dim prodId As String
Dim prodName As String
Dim prodBarcode As Byte()
Dim i As Integer
For i = 1 To 10
'Random product info
prodId = Guid.NewGuid().ToString().Substring(0, 10)
prodName = "Product " + prodId
'Set the value to encode
bcp.Code = prodId
'Generate the barcode image and store it into the Barcode Column
prodBarcode = bcp.GetBarcodeImagePng()
'Add new product
data.AddProduct(New Product(prodId, prodName, prodBarcode))
Next
'Create Report Data Source
Dim rptDataSource As New Microsoft.Reporting.WebForms.ReportDataSource("Product", data.GetProducts())
Me.ReportViewer1.LocalReport.DataSources.Add(rptDataSource)
Me.ReportViewer1.LocalReport.ReportPath = Server.MapPath("BarcodeReport.rdlc")
Me.ReportViewer1.LocalReport.Refresh()
End Sub
- That's it. Run your application. You should get the barcode images displayed on the report.
ReportViewer control lets you to export the displayed report to Acrobat PDF as well as Microsoft Excel XLS. In both cases the barcode images are maintained.
TIP: How to export to Acrobat PDF the Local Report with Barcode images without Preview
The following walkthrough shows how to programmatically export a local report to PDF without viewing it.
- Add a new ASP.NET WebForm to the project and drag & drop a Button control onto it.
- Be sure your project is referencing the following assemblies:
Microsoft.ReportViewer.Common.dll
Microsoft.ReportViewer.WebForms.dll
Neodynamic.ReportingServices.Barcode.dll
- Double click on the Button control and write the following code in the Button1_Click event procedure.
Visual Basic .NET
Private Sub Button1_Click(ByVal sender As Object, ByVal e As System.EventArgs) Handles Me.Button1.Click
'Create an instance of Barcode Professional
Dim bcp As New Neodynamic.ReportingServices.Barcode()
'Barcode settings
bcp.AutoSize = True
bcp.Symbology = Neodynamic.ReportingServices.Symbology.Code128
bcp.BarHeight = 0.25F
'Fill the object datasource.
'NOTE: You may connect to a SQL Server Database and create Product objects based on data returned from such source.
Dim data As New Catalog()
'Create random product info
Dim prodId As String
Dim prodName As String
Dim prodBarcode As Byte()
Dim i As Integer
For i = 1 To 10
'Random product info
prodId = Guid.NewGuid().ToString().Substring(0, 10)
prodName = "Product " + prodId
'Set the value to encode
bcp.Code = prodId
'Generate the barcode image and store it into the Barcode Column
prodBarcode = bcp.GetBarcodeImagePng()
'Add new product
data.AddProduct(New Product(prodId, prodName, prodBarcode))
Next
'Create ReportViewer
Dim viewer As New Microsoft.Reporting.WebForms.ReportViewer()
'Create Report Data Source
Dim rptDataSource As New Microsoft.Reporting.WebForms.ReportDataSource("Product", data.GetProducts())
viewer.LocalReport.DataSources.Add(rptDataSource)
viewer.LocalReport.ReportPath = Server.MapPath("BarcodeReport.rdlc")
'Export to PDF
Dim pdfContent As Byte() = viewer.LocalReport.Render("PDF", Nothing, Nothing, Nothing, Nothing, Nothing, Nothing)
'Return PDF
Me.Response.Clear()
Me.Response.ContentType = "application/pdf"
Me.Response.AddHeader("Content-disposition", "attachment; filename=BarcodeReport.pdf")
Me.Response.BinaryWrite(pdfContent)
Me.Response.End()
End Sub
- That's it. Run your project opening the last WebForm and click on the button to generate the PDF version for the barcode report.
Links:
This Demo
More Demos
Download Barcode Professional for Reporting Services
More Information about Neodynamic Barcode Professional for Reporting Services
Neodynamic
.NET Components & Controls
Neodynamic
Neodynamic Barcode Professional for Reporting Services